Pages

Showing posts with label indoor gardening. Show all posts

Wednesday, December 9, 2015

More Thoughts on Indoor Vegetable Gardening

We have made a commitment to grow as many vegetables and herbs as possible indoors this winter, within the limitations of our equipment and space. We are using a 250-watt metal halide fixture, which adequately illuminates about 25 square feet of growing space. In this area we have the following:

2 Tiny Tim tomato plants, each in a 12-inch pot
6 Half Pint pea plants, in two 6-inch pots
8 Fantastic Filet bean plants, in a 30-inch planter
2 Bush Spicy Globe basil plants, each in a 6-inch pot
Arugula, 6-inch pot
Upland Cress, 6-inch pot
Scallions, 6-inch pot
Corn Salad, 6-inch pot
Cilantro, two 4-inch pots

All these plants are thriving with this amount of light. At present TVA electric rates, the lighting system costs about 30 cents a day to operate.

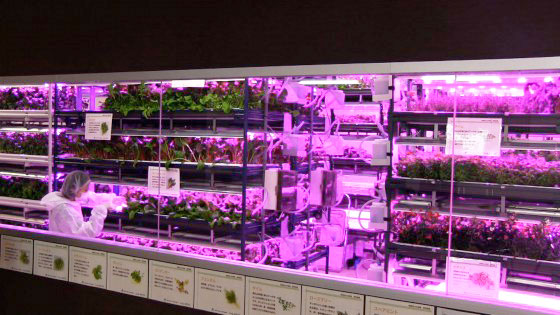
Commercial-scale indoor growing space
We have learned that surrounding the growing area with reflective surfaces, in our case some old wall mirrors, keeps the plants from leaning and causes them to grow much more uniformly.

The biggest problem we have uncovered with our indoor garden is the lack of modular growing containers. We are using an assortment of containers we happened to have on hand. If we used only square or rectangular containers, we could make more efficient use of the limited space. Check out the commercial system in the image, and you can see how the right equipment can improve efficiency.

It is important to give each crop its own container. While container gardens planted with multiple crops may look attractive, the different maturity times and growth requirements can result in inefficient space utilization. We have also found that the differing heights of mature plants means you have to be able to adjust the elevation of the pots. Tomatoes that start out only 6 inches beneath the lights when they are seedlings will need to be lowered as they grow into three or four foot tall mature plants. In our experience, really compact tomato varieties do not produce very tasty tomatoes. That's why we chose Tiny Tim, a small, but not tiny, variety, that produces 2-inch diameter fruits.

Select crops for the indoor garden with an eye toward getting the most savings in groceries. In winter, fresh herbs, tomatoes and leafy greens all command high prices at the market, and often the quality is poor. All these crops are relatively easy to grow indoors, if you select appropriate cultivars.

Thursday, December 3, 2015

Garden in the Garage

If you have a spare room, garage, or other heated space, you can produce a lot of food this winter by gardening under lights. We have grown lettuce and other green crops for many years now, using only some cheap fluorescent shop lights from the big-box store. Recently, we experimented with LED lighting, and this winter we are growing under metal halide (MH) in the garage. Each of these lighting systems has its advantages and disadvantages, and we have had some success with all of them. Nevertheless, my conclusion is that MH lighting is far preferable, so long as you have a dedicated space for the light garden.

A dedicated space is important because MH lighting generates a lot of heat, and is not suitable for use around children or boisterous pets. If you enclose the lamp, you have to have forced air ventilation to avoid overheating and a possible fire hazard. Open fixtures are the easiest to use, but obviously are also the most hazardous. It costs about 30 cents per day to operate the unit we are using.

Fluorescent lighting has been great for finishing lettuce, allowing us to start more seeds under the MH system. The MH unit effectively illuminates about 25 square feet of growing space, which, by the way, is more than the standard recommendation for a "square foot garden." Two four-foot shop lights will illuminate about 8 square feet, but the lights must be close to the plants to be effective. That limits the crops to smaller varieties, such as lettuce or arugula. Taller plants, such as tomatoes or peppers, simply cannot be illuminated effectively using only fluorescent lighting.

LED units have numerous advantages. They are bright, safe, and cheap to operate. But they come with a high initial price tag, which is why they are not yet widely popular for home use. Professional growers, however, are relying on them more and more.

Boy howdy, does the metal halide unit grow the veggies! We have been harvesting lettuce and will soon have peas, arugula, scallions, beans and corn salad. We have the first tiny green tomatoes, and expect ripe ones in time for Christmas dinner. All the plants are growing in standard nursery containers using Bonnie Growing Mix. We fertilize weekly with Miracle Gro, diluted according to the label directions. We water every other day, although daily watering may be necessary when the humidity dips this winter.

Indoor light gardening equipment is widely available. There is a local retail store, and of course many online vendors. For gardeners with a suitable indoor space, you can continue to enjoy fresh, wholesome home grown food all winter, by growing under lights. We are experimenting with different vegetable varieties, fertilizers and techniques and will continue to report on our findings throughout the winter months.

Wednesday, October 28, 2015

Radio Silence

Our radio show, "Garden Talk," was abruptly cancelled last week when the station underwent a change in format from news/talk to alternative rock. Such is life these days in the radio business, or at least that is my understanding.

My co-hosts, Dr. Sue Hamilton and Andy Pulte, who have been doing the show much longer than I have, are determined to bring it back to the airwaves before next spring. We are researching possible venues and mustering our arguments.

I will update listeners as new information becomes available. In the meantime, folks can continue to send questions to knoxgardentalk@gmail.com or to post questions and photos on our Facebook page.

Readers of this blog are invited to send questions via the email link on the home page.

We welcome comments, suggestions for improvements, and anything else you would like to share regarding the "Garden Talk" program. Our plan is to create an even better, more informative, and more entertaining show as we seek a new, larger audience.

Although the 2015 garden has yielded up just about all of its delights, the current warm spell is prolonging the harvest for some crops. We are on track to have a great harvest of fall peas, especially given the good soaking rains we have received the past few days. We continue to harvest parsley and scallions, kale will be ready any day now, turnip greens are coming along, and the cilantro is lush and delicious. All indications point to some harvest well into November.

We have started some indoor crops that are thriving under artificial lights. If you like the flavor of fresh basil, but are appalled at its cost in the grocery store, your best bet is to grow a pot of 'Bush Spicy Globe' in a south-facing window or under lights. This variety has excellent flavor and will reach the size of a volleyball in a six-inch flowerpot. Grow it in any commercial potting mix, adding a half-teaspoon of timed-release fertilizer at planting time. You could also mix in an organic plant food, following the instructions on the package. Basil needs little attention, other than regular watering. Don't let the soil get dry enough for the plants to wilt. Clip sprigs for the kitchen judiciously until the plant is at least as large as a softball. Thereafter, you can snip with greater abandon. Keep plants producing by removing flower buds as they appear.

Want to start a vegetable garden next year, but not sure where to begin? Email for information about our Home Food First program. It's designed to help first time gardeners succeed, like having your own personal gardening coach.

Thursday, October 22, 2015

The Future of Gardening

I had the pleasure of visiting with Dr. Joanne Logan's class over at the University of Tennessee yesterday. A diverse group of freshmen from all over Tennessee and elsewhere has been spending the past semester learning where food comes from and how to grow it. I received the impression that this generation of citizens will take their food much more seriously than my generation did, and good for them!

I talked about overcoming the obstacles to home food production, problems such as limited space, little or no sunshine, and the ever-present demands upon our time. You can find an outline of my remarks posted under the "Go Vols" tab on this page.

The students seemed to be most interested in the various ways that technology is being applied to revolutionize the way food is grown. We discussed research on LED lighting systems that is currently taking place at UT. Check out this video.

We also discussed the new household appliances on the market, devices intended to automate and simplify food production right in the kitchen. One example is AeroGarden. Other innovations include systems that can be controlled from a smartphone or other mobile device, and professional automated systems that fit in the space typically required by a dishwasher.

As food gardening becomes ever more popular, watch for more innovations designed to make growing at least a portion of your own food a reasonable and cost effective approach for almost anyone. As with other segments of the Internet of Things, look for more digital gardening technology in the near future. Current gardening apps are often simply digital versions of older forms of garden planning and journaling aids. Newer innovations are likely to include a greater degree of customization for individual needs, such as tailoring advice to a particular region of the country.

Plant breeders are responding to the surge in home gardening, also, with each year bringing more offerings of compact-growing vegetables suited to container cultivation or small space gardens.

Food gardening is getting to be more fun every year. It's never too soon to start making plans to grow some food at home in 2016.

Monday, May 4, 2015

Container Vegetable Gardening

Growing food in containers is becoming commonplace. From a collection of potted herbs decorating a patio to hydroponic indoor gardens under artificial light, container food production offers several benefits over traditional, in-ground gardening. But first, consider the drawbacks.

Plants in containers need more attention than those in the ground. Containers dry out rapidly, and frequent watering washes out nutrients that plants need to grow. Thus, container vegetable gardens need daily watering and bi-weekly fertilization. Weekly fertilization may be needed for fast-growing greens that are harvested more than once.

The size of any container limits the root space available to the plants. For vegetables with vigorous root systems, containers of at least five gallons capacity are needed for reasonable production.

Despite these issues, container gardens flourish on patios, kitchen counters and decks. Container gardens are mobile. They can be moved indoors or out to take advantage of weather conditions. They can also be moved around during the season to accommodate changing patterns of sun and shadow.

Container-grown vegetables remain cleaner and seldom require as much effort to wash as soil-grown crops do. The image shows the arugula harvest from one 4-inch square container grown under LED lights.

Well-tended container gardens rarely have pests, as the plants are under minimal stress.

Because container vegetables are typically grown in a soil-less sterile potting mix, soil borne diseases and insects are eliminated.

Once you start looking, you will find that numerous compact or dwarf varieties of vegetables exist, and more seem to be appearing every year. A few examples: Tom Thumb snow peas, Tiny Tim tomato, Tumblin' Tom tomato, Cayenetta hot pepper, Atlas carrots, Cherry Belle radish, Tom Thumb lettuce, Bush Spicy Globe basil, Boxwood basil, Patio tomato, On Deck sweet corn, Rougette de Montpelier lettuce, and many more. Add these to the various herbs and veggies that are normally small enough for pots, such as corn salad, scallions, and curly parsley, and you have the makings of a sensational vegetable garden that can be accommodated on a table top.

Growing in containers also means that plants will likely be close at hand when you are cooking. Including perfectly grown vegetables and herbs in your kitchen creations becomes almost effortless, and it does not get any fresher than "picked five minutes ago."

This year, we are trying something different with our indoor garden. During winter and early spring, we grew a variety of greens and herbs in plastic planters illuminated with a high-output LED light. It recently occurred to us, as the cool spring season is beginning to wind down, that we could use this growing system during hot weather to produce cool season veggies indoors. We already have planters with basil, parsley, cilantro and miniature tomatoes sitting under the lights. We plan to try radishes, carrots, corn salad, spinach, and lettuce later in the season, when these crops would do poorly outdoors.

We will keep you posted on our efforts to produce cool season veggies in our indoor garden space.

Saturday, January 10, 2015

Time for Early Plantings

Although the frigid temperatures outside may not be encouraging, now is the time to plant some slow growing crops for spring transplants. Leeks, celery, celery root and seed onions should all be started indoors by mid-January, in order to have plants ready for moving into the garden by the first week of March.

Gardeners with a coldframe should also think about starting lettuce and spinach indoors for moving to the coldframe in about a month. Other good early crop choices for coldframe production are corn salad, mizuna, bak choy, scallions, and mustards.

Free-standing coldframe
I have been experimenting with artificial light gardening for a number of years, and this season I am using an LED lighting system originally designed for aquarium illumination. While it is not ideal for plant production, it is certainly a far cry from the fluorescent shop lights I once used. The LED unit is compact, runs cool, uses only 15 watts of electricity and is producing a fine crop of microgreens and herbs for the kitchen.

If you are thinking about growing windowsill herbs this winter, start with chives, chervil and cilantro. They all grow easily from seed, do not mind crowding in the pot, and develop flavor at a young age. They all also tolerate light shade, and so will grow in a sunny window or under artificial lights more readily than more sun-loving crops. Cilantro microgreens only a couple of inches tall will brighten up your Latino or Asian dishes during the gloomy months. Chervil is almost too pretty to eat, but it adds a note of tarragon and parsley combined. Use it on vegetable or fish dishes, in particular. Chives can be used to bring a hint of onion flavor wherever you need it. If you start a few pots now and have some plants left over, you can transplant them to outdoor beds around the first of March, and they should grow and produce more herbs before the weather heats up. Chives is perennial, and clumps started from seed this spring may bloom next fall. They will certainly bloom when they are in their second season outside, especially if placed in full sun. Chervil will go to seed in May or June, as soon as the weather warms. Gather the needle-like seeds for a fall planting, and compost the rest of the plant. Chervil does not germinate well, so be sure to save a lot of seeds.


Saturday, January 4, 2014

Garden Season Begins

No kidding. The 2014 gardening season has already begun. Seed catalogs appear in mailboxes and inboxes, and despite the howling cold wind outside, some people will be starting plants this month.

If you have a small greenhouse or an indoor space with plenty of light, some of the vegetable seeds that should be started later this month include globe artichoke, celery, leeks, and onions. Cool weather ornamentals, such as snapdragon and stock, should also be seeded now. All of these are slow-growing as seedlings, and all need to be ready to transplant by March. Just remember you will need enough room to accommodate the plants as they grow. I have made the mistake of starting too many seeds more than once, and then run out of room to grow them to transplant size. If you find yourself in this situation, one remedy is to move everything outdoors during the day, as long as the temperature is high enough, and then bring everything back in before dark.

I look forward to receiving the catalog from Southern Exposure Seed Exchange every year. While I rely on Knoxville's own Mayo Seed Company for many old stand-by vegetable varieties, I choose most of the seeds for heirloom varieties from Southern Exposure. The company also has a seed rack at Three Rivers Market, for those who prefer to browse in person.

Several varieties have captured my interest this year. Here is a brief rundown.

Greasy Beans--Although several varieties are not available this year, the ones that are should be worth a try. 'Cherokee Greasy' is best as a dried bean, while 'Red-Striped Greasy' can be used green or dry. Both are pole beans. "Greasy" beans lack hairs on the pod, giving them a shiny, slippery look. They keep much longer after harvest than most other beans, allowing you to accumulate a "mess" of beans over several days, if you only have room for one or two vines. The flavor is excellent. Greasy beans may also be available from Mayo.

Cabbage 'Savoy Perfection'--This is an excellent cold-weather cabbage. I am experimenting this year with overwintering a couple of plants. The idea is for them to form heads for an early March crop. It grows well as a fall cabbage, also, and the heads are almost too pretty to harvest.

Open-Pollinated Corn--If you want to taste what "real" sweet corn used to taste like, you'll have to grow these varieties that have not had their genes tinkered with by plant breeders. Two that caught my eye are 'Country Gentleman,' in which the kernels are arranged randomly, rather than in rows, and 'Golden Bantam,' an old Burpee introduction that bears well on small plants that can be closely spaced. With either of these, however, the window for harvesting at the milk stage is very narrow. These are the types of corn that inspired the old saying, "Have the water boiling on the stove before you go out to the garden to harvest corn on the cob."

Greens--Seems like Southern Exposure constantly expands their offerings of greens. Cress, kale, mustards, Swiss chard, and more for the greens lover. Many greens are great cool to cold weather crops for the Tennessee Valley. I plan to harvest 'Lacinato' kale from an outdoor bed this afternoon, as soon as the leaves thaw. Of particular note, "Winter Bloomsdale' spinach, which has been unavailable for a while, is back.

Okra--Another veggie where the selection of heirlooms seems ever-expanding. For those with limited space, try 'Lee,' a 1978 release from the University of Arkansas that bears well on 5-foot plants. You might also want to consider one of several red-podded varieties. The contrasting color makes them harder to miss when picking. Leaving pods on the plant to mature reduces production.

'Polecat' Pea from Southern Exposure
Southern Peas--Depending upon where you live, these may be called cowpeas, crowder peas, field peas, or black-eyed peas. They are actually not native to the Americas, like regular garden beans, but made there way here from Asia via Africans who were brought here against their will. Well-adapted to warm southern summers, the numerous varieties of southern peas result from four hundred years of selection. In some cases, as with 'Piggott Pea,' the family who developed the strain kept it to themselves for most of its history. The ability of southern peas to thrive in poor soil (red clay!) is remarkable.

Squash--If your zucchini is plagued by squash borers, try growing butternut winter squash instead. The borers leave it alone. Three varieties to investigate are 'Burpee's Butternut' (bush), 'Tahitian Melon,' and 'Waltham Butternut,' the latter two both vining types that need plenty of room to run or a sturdy trellis.

Tomatoes--For tomato enthusiasts, Southern Exposure offers nine pages of listings. Have fun, but bear in mind that heirloom tomatoes may not be as productive or as easy to grow as hybrid varieties with multiple disease resistance. Every time I grow heirlooms, I have some successes and some failures.

Those are the high points, but I have barely scratched the surface of this one catalog. Many more will soon arrive, each with some irresistible new seed to tempt me. Perusing them is a great way to spend time while the outdoors is in the deep freeze.


Saturday, December 7, 2013

Windowsill Herbs

A listener to the radio show asked about growing herbs at the windowsill during the winter months. Not many of the popular herbs grow well during the short days and cold weather of December and January, but three that do reasonably well are parsley, chives, and chervil.

Chervil is the most shade tolerant of the three. The seeds can be started any time of year and need a week or more to germinate. Plant several in a small pot and keep well watered. When the first true leaves appear, use a pair of scissors to clip off all but one plant at the soil line. Feed lightly every couple of weeks and transplant to a larger container as needed. When the plant is 6 inches or more in diameter, you can harvest a few leaves, and continue to do so for the remainder of the season. In March, you can transplant the chervil outdoors, where it will continue to provide fresh leaves, and, eventually, a huge supply of seeds for next year and to share with friends. Chervil is milder than parsley and has a hint of tarragon flavor, so it goes well with many foods, especially fish, chicken and many vegetables.

Parsley grown indoors never gets as large as plants in the garden, but nevertheless it does adapt to the warm, dry air and low light indoors. If you have a sunny window, you can either dig up a plant from the garden, pot it up and bring it in, or start new plants from seed. Follow the directions given above for chervil plants. To speed germination, soak parsley seeds in water for four days, changing the water every day. You will see the seeds change from almost black to light brown, as the water removes germination inhibitors. Plant the seeds on the fourth day, and they should sprout in a week or less. Parsley needs nitrogen to keep it green and flavorful, so don't be stingy with the fertilizer.Well-established garden parsley usually overwinters in east Tennessee, and can be picked any time it is not frozen. It will bolt quickly, however, with the arrival of spring.

Chives are among the easiest of onions to grow. Just sprinkle seeds in a pot about 8 inches in diameter and wait for them to get as large as you like before harvesting. Clip the leaves with scissors and allow them to re-grow. You can transplant chives into the garden in spring, where they will remain for years without much attention other than weeding. Chive blooms are beautiful in bouquets and tasty, too.

Other herbs to try indoors in winter are mints and rosemary. The latter is available now as a topiary shaped like a little Christmas tree. It is a delicious seasoning for poultry and pork. Mints may be started from seed, but it is easier to root cuttings from the grocery store. Select healthy looking cuttings, remove the bottom two pairs of leaves (use them in cooking) and re-cut the stems with a sharp knife. Set the cuttings in a glass of water and change the water every few days. Soon, the cuttings will root and you can pot them up. Do not fertilize mint, but do keep it moist.

Having a few fresh herbs around is a wonderful way to perk up winter meals.

Saturday, November 30, 2013

Microgreens and Holiday Citrus

I hope everyone had an enjoyable and safe Thanksgiving holiday with family and friends. Our menu included sweet potatoes and cucumber pickles from last year's garden along with fresh herbs and greens from the greenhouse.

Even if you only have a sunny window available for winter gardening, you can continue growing food. I discussed sprouts in the last blog post. Microgreens are sprouts taken a little further along. They are grown in a potting medium, but you harvest when they are only a couple of inches tall. Some of the most popular microgreens are cilantro, beets and sunflowers. All of the brassicas make good microgreens, as well.

Cilantro microgreens are popular with gourmet chefs because they develop flavor at a young age and have lacy foliage. Beets make the cut owing to their bright red coloration. Sunflowers are allowed to grow to about three or four inches tall, at which time they can be made into a satisfying salad, all by themselves.

To grow microgreens, fill a shallow container with sterile potting soil, water well and sow seeds thickly, but otherwise as you would sow them in the garden. Make sure the container drains well, or the seeds will simply rot. I like to reuse plastic containers from the produce department of the grocery store. The pint cartons that mushrooms come in work well. Just poke a few holes in the bottom with a sharp instrument.

Water your indoor garden regularly and keep in a sunny window or under lights. Seeds should germinate in the time indicated on the package. Depending on the variety, this can be a few days to a week or more. When the seedlings are the size you want, harvest by clipping them off a ground level with a pair of scissors. Microgreens are a great addition to any salad, and help perk up the flavor of winter produce like greenhouse tomatoes.

We will soon be harvesting Meyer lemons. If you are only going to try one citrus tree in a container, this is the one to go for. I have made plenty of mistakes, but we still have 11 lemons in various stages of maturity.

Saturday, November 23, 2013

Growing Sprouts

During the cold, damp and dreary days of late fall and winter, not much is going on in the garden. While cold-hardy greens can be produced under protection, growth slows with reduced light and cooler temperatures.

The accompanying photo, courtesy of Patrick Rakes, shows his abundant cold frame garden. Kale, spinach, lettuce and other greens are growing abundantly. The photo will give you an idea of how to construct a PVC support for plastic film, converting a raised bed into a cold frame.

One way to satisfy the gardening itch in winter is to grow sprouts. All you need is some simple equipment and a sunny windowsill or kitchen counter.  Seeds for sprouting are available in specialty food stores like Earthfare and Three Rivers Market. You can sprout leftover garden seeds, too, but just make sure they have not been treated with pesticide before you begin. Among the best choices for a beginning sprout garden is alfalfa.

While you can purchase a ready-made seed sprouter, all you really need is a wide mouth jar, a piece of cheesecloth, and a rubber band. To grow about two cups of alfalfa sprouts, place one tablespoon of seeds in the empty jar. Cover the mouth with the cheesecloth, securing it with the rubber band. Add enough lukewarm water to cover the seeds by an inch. Leave on the kitchen counter overnight. The next morning, drain, rinse well, and place in a warm, dark place, such as a cupboard. Rinse the seeds with cold tap water two or three times every day, and move the jar into the light when roots have developed and are over 1/4 inch long. Within about five days, you will have a jar of green, delicious sprouts. They will keep another week if placed in the refrigerator in an airtight container. Put a paper towel on the bottom of the storage container to absorb excess moisture, which will shorten storage life.

Many other seeds besides alfalfa can be used to grow sprouts. Radish, broccoli and mung beans are some of the most commonly sprouted seeds, but just about any vegetable seed can be tried. Commercial bean sprouts are grown from mung beans under special conditions. You will not be able to duplicate these conditions in the kitchen, but you nevertheless can produce acceptable bean sprouts.

Radish and other mustard family sprouts have a spicy flavor that perks up a salad. Try using a mixture of sprouts on a sandwich instead of lettuce. I particularly like sprouts with chicken salad and egg salad. Sprouts can also be used to garnish a variety of dishes, adding color, flavor and nutrition.

Sprouts have sometimes been cited as the source of bacterial infections in children, the elderly and people with compromised immune systems. Look for sprouting seeds that have been tested for contamination. This information will appear on the label. Observe proper sanitation in the kitchen when preparing sprouts, and you should not have any problems. It is worth noting that most reported issues have been with commercially mass-produced sprouts. Many producers now test each batch, so look for label assurances when you buy.

Discard the cheesecloth after each batch of sprouts, replacing it with a new one, or purchase perforated plastic lids that will fit a standard Mason jar. You can also purchase a complete sprouting system made from plastic. Either way, growing sprouts is a great way to garden when the weather outside is less than beckoning.

Friday, November 9, 2012

Start Ginger Now for Next Year

GROWING GINGER
Ginger is in season. Three Rivers Market has a pile of it in the produce case, sourced from Mobile, AL. Lots of green shoots and eyes are present on the rhizomes. Now is the time to plant for a ginger crop next year. I mentioned growing ginger briefly in an earlier post. Here are more details on growing it in the Tennessee Valley.
Select a healthy looking piece at the market. It should have at least two green eyes showing. Mine cost less than $2. If you find a piece with green shoots, use them as a guideline for planting depth. Try to find organic ginger that looks and smells fresh. I have seen ginger in the supermarket that looks so dried out that it is unlikely to sprout. I have also read about possible chemical treatments to inhibit sprouting.
Put the piece of rhizome in a large pot. The roots need plenty of room to expand. Use any good potting soil that would be suitable for houseplants. Mix in some Osmocote, or an appropriate amount of balanced organic fertilizer. If using Osmocote, you need about a tablespoon per gallon of growing mix. Ginger is a tropical plant and a heavy feeder. Water well and place in a warm, sunny spot with your other tropical houseplants.
Ginger normally goes dormant during the dry winter season, so it may take a month or more for new shoots to appear. Do not allow the soil to become bone dry, but don’t keep it soggy, either. One approach at this stage is to let the pot drain overnight, then enclose it in a trash bag to maintain high humidity. Check periodically for new green shoots and remove the bag as soon as they appear.
Once it sprouts, treat the pot of ginger like your most prized tropical houseplant, with plenty of sunshine, regular watering and additional fertilizer if it begins to show any sign of yellowing. Protect it from cold drafts and keep it in a warm spot. Around next Memorial Day, when the night temperature will reliably remain above 50 degrees, transplant the plant to a sheltered spot with full sunshine, in soil that would be suitable for tomatoes. Ginger does not like cold, winds, drought or soggy soil. Take care not to disturb the roots too much when transplanting, to keep it growing steadily. Irrigate if rainfall is insufficient, and feed regularly. Ginger's requirements in this regard are much like those of the squash family, another group of tropical plants that need heat, water and fertilizer to produce well.
Ginger is unlikely to be attacked by pests other that slugs. Use your favorite method to control them.
By the end of October or thereabouts, the plants will start to yellow. This is a sign they are ready to enter dormancy, and that you are ready to dig. You should easily get two or three pounds of roots from the pot you started in November. Replant some, then peel and freeze the remainder.
For those with limited space, you can transplant the ginger to a larger pot on the patio or balcony in late spring. Choose a broad, relatively shallow container that will allow for maximum root spread. Container plants may require daily watering during the hottest summer days. With all the irrigation, you will need to fertilize frequently to keep them growing.
HOW THE GREENHOUSE HELPS
We continue to learn how to make the best use of our 6 foot x 8 foot plastic greenhouses. By way of review, we were disappointed that the failure rate is 100% on the interior tie-downs that secure the plastic cover to the steel frame. The tie downs supplied with the greenhouse (manufacturer specs here) are made with a white stretch cord that turns to powder after a few months in the sun. We will have to replace them with UV-resistant zip ties. This seems like a problem that could have been easily avoided without adding to the cost of manufacturing. We installed them almost exactly one year ago.
Even an unheated greenhouse can extend your growing season considerably, we are learning. We still have pepper plants untouched by the recent frosts, even though the temperature in the greenhouse has reached a low of 30 degrees F. Frost forms when solid surfaces are cooled below the dew point of the surrounding air, and below the freezing point. Many plants can tolerate temperatures below freezing, as long as frost does not form on their leaves. The reason is that the ice crystals physically damage the plants, which would otherwise weather the cold and resume growth when the temperature rises.
A greenhouse, coldframe or cloche provides some protection from falling temperatures during the daytime, owing to the greenhouse effect, but without added heat or a means of storing heat, the greenhouse can drop to freezing at night. Frost, nevertheless, will not form unless the temperature reaches the dew point. As the absolute humidity increases toward 100% saturation, the dew point approaches the ambient temperature. For example, at 35 degrees and 40 percent humidity, the dew point is 13.2 degrees. At 100 percent humidity, it is 35 degrees. You can find a dew point calculator for any given temperature, relative humidity here.
In a greenhouse, where the humidity is higher than the outside air, dew will form on plant surfaces at a higher temperature than it does outside. The presence of liquid water on the leaves then in turn protects the leaves from reaching the freezing point, where frost could form.

Wednesday, April 4, 2012

Strawberries in Containers

The strawberries we enjoy today result from a long history of selection and hybridization among several of the fifty-odd natural species. Everbearing (or day-neutral) strawberries produce a bumper crop in early summer, another smaller crop in late summer and a few berries here and there throughout the season in between. Because of the long harvest season, they are a good choice for home gardeners.
Regardless of the variety, strawberries grown in the ground must be relocated about every three to five years. The plants are subject to viral disease and pests that can reduce yields significantly. Many of these problems persist in old, dead foliage or in the soil. Regular renewal of the plants and their growing medium offers the best natural defense against these problems. In terms of standard crop rotation, strawberries should be separated by five years from soil that has previously grown any member of the potato family. This is because several important crop diseases are common to the two groups of plants.  Crop rotation can be a real problem for the backyard grower with limited space. In the case of strawberries, container growing offers a great alternative, since plants can be repotted in new, sterile growing mix every season or two.
Plant breeders have produced new lines of strawberries that are better suited to container cultivation than their traditional counterparts. Dutch hybridizers have produced varieties that not only bear luscious, tasty strawberries but also have large, showy flowers. This makes the plants decorative as well as productive. The variety shown in the photo at left is “Tristan.”
Strawberries need full sun and a well-drained sandy soil of slightly acidic pH, about 6.0-6.5. Any good commercial potting mix will work for strawberries, or you can make your own by mixing equal parts of sifted compost, horticultural peat and sand. Rainfall or irrigation should provide an inch or two of water per week during the growing season. Purchase certified disease-free plants in late winter or early spring, before they break dormancy. Although plants will grow and bloom in a small container, choose a pot that holds at least a gallon of growing medium for best results. Smaller containers may need watering more frequently than you would prefer.
I try to avoid the traditional “strawberry jar” (an urn with extra openings in the sides for planting) because they seldom hold enough soil to accommodate the roots of all the berry plants tucked into them. I also avoid hanging baskets, because I find they dry out too quickly and thus demand too much attention during the hot summer months.
Remove runners from container plants as they form. Allow the occasional runner to root in a small pot before detaching it, if you want to increase your stock of plants. Just set the crown of the runner on the soil. When it roots itself sufficiently to resist a gentle tug, cut it free.  Such plants will bear the following season, typically.
Feed everbearing strawberries regularly. Due to the repeated flushing of the container with water, nutrients will be lost. Watering with compost tea or a similar soluble fertilizer every other week will keep plants productive. Or use a timed-release fertilizer.
After the first frost sends plants into dormancy, remove any dead foliage and place the containers in a sheltered spot for the winter. Cover them with a blanket of pine needles or autumn leaves. You can wait until the plants break dormancy to return them to their sunny position on the porch or balcony, or you can bring a plant or two indoors in early January. Place the pots in the sunniest location available, protected from frost. This will allow you to harvest the first berries about a month to six weeks earlier than normal. We currently have berries ripening along with spring lettuce, allowing us to enjoy a delicious salad topped with freshly picked berries. See the accompanying photo of a plant forced as just described, taken yesterday. This plant, by the way, is growing beautifully in a nursery container holding only a half gallon of growing medium, demonstrating how well adapted to container culture this breeding line really is. The variety shown is "Loran." The fruits are slightly tart, and bursting with strawberry flavor. If you get too much rain while fruits are ripening, they tend to become watery. Another advantage to containers is that they can be moved out of the rain when needed, to avoid this problem. 
A well-grown plant in a roomy container can produce about one pound of fruit or more per season. Strawberries can be frozen or made into jam or preserves. Rich in vitamin C and phytochemicals, fresh strawberries can be added to salad or turned into a cold fruit soup (see the recipe below). They also star, of course, in desserts like strawberry shortcake.
Strawberry Soup
For 4 servings:
1 pint fresh strawberries, stemmed
2 cups apple or white grape juice
Juice of one small lemon
10 large, fresh mint leaves, plus small leaves for garnish
Salt (if desired)
Sugar (if desired)
Sour cream or yogurt to serve (if desired)
Reserve four perfect strawberries for garnishing the dish. Roughly chop the remaining strawberries and process in a food processor or blender, in batches if necessary, with the juices, the mint leaves and a pinch of salt, until you have a smooth puree. Chill until very cold. Taste and correct the seasoning with salt, lemon juice or sugar, as you deem necessary. Slice the reserved strawberries lengthwise, beginning at the pointed end, stopping before you completely cut through the stem end. Ladle the soup into chilled bowls. Place a dollop of sour cream or yogurt, if using, in the center. Fan out the berries gently and float one on each bowl of soup. Garnish with small mint leaves and serve.


Tuesday, February 14, 2012

The Out-of-Season Season

This time of year, everything seems to be out of season locally. My most recent visit to Three Rivers Market turned up no local produce items, other than storage sweet potatoes. Given that I am harvesting herbs and greens from both outdoor beds and my cold frames, you'd think someone would be doing this commercially.

Last month, there were plenty of local green crops on the shelves. So why now a dearth? I can think of lots of possible explanations. All of which boil down to a matter of timing on the grower's part. Hopefully, some enterprising farmer will realize that he or she could sell local produce during February and plan accordingly next winter.

Cabbage plants under artificial lighting
In all fairness to our astute local growers, it is much trickier to produce a winter crop around here owing to the sporadic availability of sunshine. Short days in December and January cause crops to slow down and stop growing. I have experimented with various types of supplemental lighting for years. Given our relatively low electric rates in the Tennessee Valley, about 9 cents per kilowatt/hour for residential customers, growing winter crops with supplemental lighting might be cost effective for an efficient operation.

It would be interesting to compare the carbon footprint for producing local crops with supplemental lighting, versus trucking the same crops long distances. I know, for example, that lettuce can be grown to harvestable size entirely under fluorescent lights. The photo at right shows sturdy lettuce plants now about a month old. And below, Ashley lettuce, grown under lights, has reached leaf lengths of about five inches, big enough for a salad. These plants are going out to the cold frame soon, but if they were potted up and left under the lights they would mature. Lettuce produced indoors has a much more tender texture. The leaves are thinner. We are experimenting with air movement to get a crispier lettuce. By using a small fan to gently circulate air around the leaves, we encourage them to become sturdier, and hence more palatable.

Lettuce 'Ashley' under fluorescent lighting
Home and commercial growers alike should experiment with supplemental lighting. New technologies, such as LED lighting arrays, offer promise of space-saving designs that use a fraction of the electricity of currently popular equipment, such as fluorescent and metal halide lighting. The biggest drawback to LED systems for home use is their high initial cost, but the price should come down as the equipment gains in popularity.

Tuesday, February 7, 2012

First Harvest of Overwintered Lettuce

I am going out to the cold frame this afternoon to pick the first lettuce of the year. The plants were started in October and transplanted to the cold frame after 30 days in cell trays. They only had time to establish themselves before the short days and cold temperatures stopped their growth. Now that the days are getting longer, and with the help of the January thaw, they have grown enough to pick.

We are especially happy with the performance of the cultivar, Ashley, the frilly red one in the middle of the photo. Michelle, the bright green one in the foreground, was the second best performer. Less inspiring was Rougette de Montpelier, a red-tinted butterhead type that apparently does not like to overwinter.

As a general rule, lettuce varieties with red in the leaves, and those with extremely "savoyed," or finely divided, leaves, have the greatest cold tolerance. Given our experience with these three, savoyed leaves may trump red pigment.

Last month, we started more seeds of Ashley. After the plants shown here are harvested, we will add some cottonseed meal to the bed and replant. We will soon start more seeds, of some different lettuce cultivars, to be transplanted outside the cold frame in March.

The oblong plastic planters at the left of the photo above represent an experiment we began last fall. We purchased our cold frames late in the season, because we waited for the store to put them on clearance. They did not go up until November 8, 2011. The planters were handy, and there was some space on the foundation of the cold frame to accommodate them. Therefore, we sowed seeds of anything cold tolerant that we happened to have on hand. As you can see, the cilantro sown in the upper planter germinated profusely. It has just begun to grow again after pausing for the winter. In the lower planter, arugula--described on the package as a "wild" form--barely germinated. A patch of the same seeds sown a month earlier outdoors germinated very well, but to date is no more than two inches tall. We will wait to see if more seeds germinate in the planter this spring, but so far this variety has been a disappointment. Two others, Parsley 'Krausa' and Dill 'Dukat,' were also sown on November 8, and barely germinated. On the other hand, Corn Salad 'Vit,' sown the same day, sprang up everywhere, grew well during the coldest weather, and transplanted successfully into the ground bed. New transplants flank lettuce 'Lollo Rossa' in the image above right. This is another good lettuce for overwintering, although it does not grow as large as it does during spring.

The blue flowers in the photo are violas. We like to use them to divide our cold frame beds into planting blocks. They bloom all winter and the flowers add a welcome note to salads, too.

Thursday, January 26, 2012

Indoor Light Gardening

Please Share Your Recipes!                                                                                                              
If you are using any of our food products in a favorite recipe, please share it with us! Simply go to our In The Kitchen Page and scroll down to the bottom. You can post your recipe as a comment. From time to time we will share our favorites in the blog.                                                                                             
Thank You!                                                                                                                                          

Starting Seeds Indoors Under Lights
Even though the days are perceptibly longer now, there's still not enough light for many vegetable and flower plants. This week, for example, the days are about 9 hours and 45 minutes long. When starting seeds indoors for transplanting later in the season, a sunny window seldom provides enough light. But you can supplement or replace the sunlight with fluorescent lighting. Everything you need for an indoor light garden can be found at your local DIY store. 

A fluorescent "shop light," consists of a four-foot fixture holding two 40-watt fluorescent lamps. This is the minimum size we recommend for starting plants. Smaller fixtures have correspondingly less light output, and often cost more than the mass-marketed shop lights. Costing around $10 each, shop lights are affordable, and three of these fixtures will provide enough light to start even sun-loving plants like peppers. Our indoor light garden consists of steel baker's racks (also from the DIY store), several shop lights, electrical power strips and a couple of timers. We keep the lights on for a minimum of 12 hours per day, and have successfully started cabbage, chard, onions, leeks, celery and snapdragons so far this season.

We also tried a so wingof lettuce and learned an important lesson about indoor gardening. Even though the plants have plenty of light, they need to be kept at the correct temperature for proper growth. Our growing space hovers around 75 degrees during the day, and this has led to some disappointing results with lettuce, as the accompanying photo illustrates. The seedlings grew too quickly and fell over. We are going to move one of the shelf units to the garage, where the temperature averages about 10 degrees cooler. The nice thing about lettuce: it germinates so quickly that we have plenty of time to replant.

For the serious food gardener who wants to get the maximum jump on the season, an indoor light garden is the next best thing to a heated greenhouse, and a whole lot less expensive to set up and maintain. Each bank of three shop lights consumes 240 watts of electricity (6 times 40 watts per lamp). Running the lights for 12 hours per day, therefore, uses 2.9 kilowatt hours of electricity. So the electricity to operate each bank is 27 cents per day. The whole set-up will cost about $30 per month to operate, but we will only need it for three months. For about $100 in electricity we can grow enough plants to yield several times that much in fresh veggies plus have plants left over to share or sell.