Although winter vegetables dominate the offerings this week, several varieties of fresh chili peppers, from Jefferson County, remain available in the market. The daikon radishes from Whitley County, Kentucky, are exceptional. I also noted Jerusalem artichokes (Hawkins County), bok choy, lettuce, mustard and kale (all from Loudon County) and mixed cooking greens (Jefferson County). Regional offerings included apples from North Carolina and ginger from Alabama.
A happy find, oyster mushrooms from Sevier County are some of the best I've ever seen. They surely benefited from the wet, relatively mild weather of late. Three Rivers Market maintains an excellent selection of mushrooms, even offering pre-inoculated shiitake logs for the mycophile on you holiday gift list. Although only a few varieties are locally produced, I've enjoyed white button, crimini, portabella, shiitake, oyster, king oyster, maitake, and three types of beech mushrooms (yellow, brown and white.) One thing I love about mushrooms is that they are always organic (whether certified or not), because fungi will not grow successfully with chemical contaminants in their environment.
Shiitakes, for example, are cultivated on freshly cut logs. The best time to start a shiitake log is in autumn and early winter, hence the appearance of ready-to-go logs in the marketplace. Growing your own shiitake is easy, if you follow the simple instructions that come with each log. The logs have to sit for a year before they will bear mushrooms, but the wait is worth it, and they require little attention in the meantime. Jerry and I are planning to start some logs from a Bradford pear we plan to cut down after Christmas. If this works, cultivating shiitake would be a good use for all the weedy, dangerous Bradfords that need to be taken down around the county.
Many people are aware that the Bradford pear is prone to splitting at the crown. Untold numbers of them came down during last spring's spate of severe storms. We have lost two out of three in the last few years, so number three is coming down on our schedule, not its own.
What is not commonly known is that the tree is also notorious for sprouting from seeds carried by birds, whereupon it out-competes native trees and will eventually dominate an area. Like privet and kudzu, Pyrus clevelandi 'Bradford' is an exotic pest plant. Even the undeniable attractiveness of its spring blooms is offset by their scent, which is reminiscent of a fish processing plant.
I say we cut them all down and use the logs to grow mushrooms.
Friday, December 9, 2011
Thursday, December 1, 2011
Local Food a Fool's Errand?
A few weeks back, Knoxville alternative newspaper, Metropulse, published an article that pooh-poohed local food movements across the country as a silly fad pursued by the affluent. Concluding that
I wonder if it has occurred to Ms Gervin that the people indigenous to this Valley prior to the arrival of Europeans fed themselves quite successfully without resort to imported food? Further, many of the European immigrants who settled into the Southern mountains were so isolated from the rest of the country that they had little choice but to be "locavores," although the term itself would not appear in our vocabulary for two centuries. Indeed, I can recall my Grandmother's grocery lists, which began, "sugar, coffee, oatmeal..." but seldom itemized eggs, fresh vegetables or pork.
It is undoubtedly true that busy urban/suburban dwellers lack sufficient time to raise and slaughter their own hogs as my grandfather did. But, why not Benton's, if you are going to buy bacon, anyway?
I also thought the article gave short shrift to the hundreds, perhaps thousands, of local vegetable gardens that have appeared in recent years. One even sees planters of herbs perched upon apartment balcony railings. This is the ultimate local food, and its increasing prevalence is surely having a measurable effect upon garden centers, based upon my personal investigations. It therefore seems hard to deny that locavorism benefits the local economy and provides better, more nutritious foods while conserving fossil fuels. To disregard the local food movement only because it remains relatively small is equivalent to having said, several decades ago, that the human impact on climate could be disregarded for similar reasons.
To demonstrate that one can produce highly enjoyable food using ingredients available in pre-European America, consider this delicious holiday season treat that I developed. Wild pecans became available for the first time this season at one of the local markets. Pecans once grew throughout the eastern United States. Measurements are given by weight, rather than volume, to allow for easier substitution of, for example, standard Georgia pecans (which are of hybrid origin and therefore much larger than the wild ones). The total yield is about three cups.
American Munch Mix
2 ounces wild pecans or Georgia pecans
2 ounces raw pepitas (hulled pumpkin seeds)
2 ounces raw sunflower kernels
4 ounces raw American hazelnuts
1/2 teaspoon coarse sea salt
1 tablespoon sunflower oil (or other flavorless cooking oil)
1 teaspoon honey
1/4 teaspoon ancho or other pure ground chili pepper
1 1/2 ounces sweetened dried cranberries
Preheat the oven to 250 degrees. In a large bowl combine the nuts and seeds with the salt. In a small microwaveable bowl, combine the oil, honey and chili powder. Microwave 30 seconds, just to blend the ingredients. Drizzle the dressing over the nut mixture, stirring until everything is well coated. Transfer to a parchment lined rimmed baking sheet and place in the oven. Bake, stirring every 10-15 minutes until the pepitas are lightly browed, about 45 minutes in all. Cool slightly, then combine with the dried cranberries. Serve at once, or store in an airtight container at room temperature for up to 1 week. (But it won't last that long!)
- "Not all local food tastes better, but the food that does is the best tasting food you’ll have. So let’s stop pretending there’s any other reason to eat local than that."
I wonder if it has occurred to Ms Gervin that the people indigenous to this Valley prior to the arrival of Europeans fed themselves quite successfully without resort to imported food? Further, many of the European immigrants who settled into the Southern mountains were so isolated from the rest of the country that they had little choice but to be "locavores," although the term itself would not appear in our vocabulary for two centuries. Indeed, I can recall my Grandmother's grocery lists, which began, "sugar, coffee, oatmeal..." but seldom itemized eggs, fresh vegetables or pork.
It is undoubtedly true that busy urban/suburban dwellers lack sufficient time to raise and slaughter their own hogs as my grandfather did. But, why not Benton's, if you are going to buy bacon, anyway?
I also thought the article gave short shrift to the hundreds, perhaps thousands, of local vegetable gardens that have appeared in recent years. One even sees planters of herbs perched upon apartment balcony railings. This is the ultimate local food, and its increasing prevalence is surely having a measurable effect upon garden centers, based upon my personal investigations. It therefore seems hard to deny that locavorism benefits the local economy and provides better, more nutritious foods while conserving fossil fuels. To disregard the local food movement only because it remains relatively small is equivalent to having said, several decades ago, that the human impact on climate could be disregarded for similar reasons.
To demonstrate that one can produce highly enjoyable food using ingredients available in pre-European America, consider this delicious holiday season treat that I developed. Wild pecans became available for the first time this season at one of the local markets. Pecans once grew throughout the eastern United States. Measurements are given by weight, rather than volume, to allow for easier substitution of, for example, standard Georgia pecans (which are of hybrid origin and therefore much larger than the wild ones). The total yield is about three cups.
American Munch Mix
2 ounces wild pecans or Georgia pecans
2 ounces raw pepitas (hulled pumpkin seeds)
2 ounces raw sunflower kernels
4 ounces raw American hazelnuts
1/2 teaspoon coarse sea salt
1 tablespoon sunflower oil (or other flavorless cooking oil)
1 teaspoon honey
1/4 teaspoon ancho or other pure ground chili pepper
1 1/2 ounces sweetened dried cranberries
Preheat the oven to 250 degrees. In a large bowl combine the nuts and seeds with the salt. In a small microwaveable bowl, combine the oil, honey and chili powder. Microwave 30 seconds, just to blend the ingredients. Drizzle the dressing over the nut mixture, stirring until everything is well coated. Transfer to a parchment lined rimmed baking sheet and place in the oven. Bake, stirring every 10-15 minutes until the pepitas are lightly browed, about 45 minutes in all. Cool slightly, then combine with the dried cranberries. Serve at once, or store in an airtight container at room temperature for up to 1 week. (But it won't last that long!)
Tuesday, November 22, 2011
Local Food Report
One of our goals for this blog is to report on the availability of local produce and other foods. We will use the same definition of "Local" as does Three Rivers Market, that is, from the East Tennessee region within 100 miles of Knoxville. This week's offerings come from Hancock, Hawkins, Jefferson and Loudon counties.
"Certified naturally farmed" is a designation for food raised without harmful chemicals and pesticides, and is less costly to the farmer than "certified organic" status. Only food that has been officially certified may be labeled as "organic."
Plenty of ham, bacon and cheese is also available from local and regional (within 500 miles) producers. Since foods like these are less perishable, we will focus more on the availability of fresh produce, especially during the winter months.
Both ginger and fresh turmeric are also available, coming from Mobile, Alabama.
- arugula, organic
- bok choy, naturally farmed
- kale, organic
- kohlrabi
- lettuce, naturally farmed, including Merlot, Romaine, butterhead and looseleaf types
- mustard
- peppers, including anaheim, jalapeno, hungarian wax, and sweet bell types
- Swiss chard, organic
- turnips, organic
"Certified naturally farmed" is a designation for food raised without harmful chemicals and pesticides, and is less costly to the farmer than "certified organic" status. Only food that has been officially certified may be labeled as "organic."
Plenty of ham, bacon and cheese is also available from local and regional (within 500 miles) producers. Since foods like these are less perishable, we will focus more on the availability of fresh produce, especially during the winter months.
Both ginger and fresh turmeric are also available, coming from Mobile, Alabama.
Garden Bounty for Thanksgiving
I wonder if East Tennesseans put so much celery in their turkey dressing because it produces such a fine fall crop. We started several celery plants back in February. They are notoriously slow-growing and we did not transplant them until May. But by mid-July we harvested some thin, tough stalks that were suitable for flavoring soups. During the worst of summer's heat, the plants merely sat there, looking a bit bedraggled. Since Labor Day, no doubt with a boost from unusually abundant autumn rainfall, they have recovered. Although not as large as supermarket celery, the stalks are sweet and succulent. Ideal for sauteing with onions to add to the dressing on Thursday.
 A hard freeze last week finished off the peas, but we still have carrots, turnips, Romaine lettuce, spinach, parsley, dill, and cilantro in the outdoor beds. Our two new plastic greenhouses have more lettuce, spinach, kale, bok choy and various herbs that we will enjoy during the next three months, by which time we will be starting seeds for next year. One of the things we love most about gardening is the cyclical flow of activities throughout the year. With the addition of the greenhouses, we have not only extended the season of harvest, but also the season of gardening pleasure.
This year, as the holiday season approaches, why not consider food gardening gifts? Instead of a potted tropical orchid, give someone you love a kumquat or Meyer lemon in a pot. Perennial herbs in small pots make great gifts, too. Unlike a poinsettia, which will fade by January, a living food plant can bring pleasure throughout the upcoming year. It always helps to include a card with growing instructiions, and perhaps a favorite recipe. Want to help a friend get started gardening? Share seeds with them. You could put together a simple veggie and herb garden plan, write up some instructions, and provide the seeds. This is a great way to use up extra seeds at the end of the season. Include seeds you have saved, if you have them, for a special, personalized touch.
Happy Thanksgiving to all!
John and Jerry
Thursday, October 6, 2011
Veggies Starts From the Grocery Store
An oft-repeated warning to gardeners is to avoid using produce from the grocery to start garden plants. The usual caveat is that they will have been "treated with a sprouting inhibitor." Our experience suggests otherwise. So far in the past two years we have successfuly grown garlic, ginger, Irish potatoes and sweet potatoes purchased from our usual grocer.
Garlic this year produced a bumper crop, with many heads the size of tennis balls.
Last year we produced about 8 times the weight of potatoes that we planted. I picked out several different types of spuds from the bin at Kroger. While not all of them behaved the same in our garden, all did produce potatoes. We were happiest with blue fingerlings and an elongated yellos-fleshed potato with red skin. These we will try again next season. (Due to space limitations, we only grow potatoes every other year.)
This year's success stories are ginger and sweet potatoes.
We planted two small pieces of ginger in pots last December and kept them going in the house all winter. They grew very slowly to about eight inches tall. In May, we transplanted them to one of the garden beds. After five months, we harvested just over two pounds of high-quality young ginger roots.
 We rooted a sweet potato in water last February, and transplanted the slips to pots around the first of April. As soon at the weather was warm enough, we put them in the garden. Last Sunday we dug over 17 pounds of sweet potatoes.
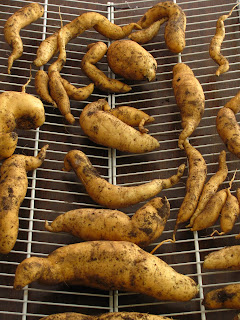 Those big ones in the foreground are two pounds each.
We just planted shallots, also purchased at the grocery for a fraction of the price of "seed" stock. I fully expect to harvest a crop this time next year.
Garlic this year produced a bumper crop, with many heads the size of tennis balls.
Last year we produced about 8 times the weight of potatoes that we planted. I picked out several different types of spuds from the bin at Kroger. While not all of them behaved the same in our garden, all did produce potatoes. We were happiest with blue fingerlings and an elongated yellos-fleshed potato with red skin. These we will try again next season. (Due to space limitations, we only grow potatoes every other year.)
This year's success stories are ginger and sweet potatoes.
We planted two small pieces of ginger in pots last December and kept them going in the house all winter. They grew very slowly to about eight inches tall. In May, we transplanted them to one of the garden beds. After five months, we harvested just over two pounds of high-quality young ginger roots.


We just planted shallots, also purchased at the grocery for a fraction of the price of "seed" stock. I fully expect to harvest a crop this time next year.
Veggie and Herb Starts From the Grocery Store
An oft-repeated warning to gardeners suggests avoiding using vegetables from the grocery store to start new plants for the garden. The usual reason given is that the products have been "treated with an inhibitor" to prevent sprouting. After having successfully raised a number of plants purchased at my local grocery, I am convinced that these warnings are wrong.
Long ago, I learned to root herb cuttings from the market. I simply purchase a bunch of fresh herbs. Then, choosing the best looking stems, I remove the leaves from the bottom two-thirds, recut the lowermost half inch from stem and place the cuttings in a glass of water. I place the glass in indirect light and in about two weeks to a month I have rooted cuttings ready to pot up. I still have thriving plants of Greek oregano and French thyme that I started this way, and every season I start both mint and basil. These last two practically root overnight.
Besides herbs, I have also grown garlic, ginger, potatoes and sweet potatoes from the produce department. This year's garlic crop was one of my best ever, with some heads the size of tennis balls. Several varieties of potatoes that I planted last year gave us a bumber crop of delicious spuds that we enjoyed all winter. This year, I planted two sweet potato plants that had been started in February from a root purchased at the grocery. We recently harvested over 17 pounds of potatoes from those two plants.
 A couple of pieces of ginger root, less than three ounces altogether, yielded over two pounds of young ginger, pictured above.
This week, we planted shallots from the grocery. I fully expect we will have good results at harvest time next fall.
So, if you are appalled at the prices being asked for seed potatoes just purchase a few at your local market. Chances are, you will enjoy the same success that Jerry and I have.
Long ago, I learned to root herb cuttings from the market. I simply purchase a bunch of fresh herbs. Then, choosing the best looking stems, I remove the leaves from the bottom two-thirds, recut the lowermost half inch from stem and place the cuttings in a glass of water. I place the glass in indirect light and in about two weeks to a month I have rooted cuttings ready to pot up. I still have thriving plants of Greek oregano and French thyme that I started this way, and every season I start both mint and basil. These last two practically root overnight.
Besides herbs, I have also grown garlic, ginger, potatoes and sweet potatoes from the produce department. This year's garlic crop was one of my best ever, with some heads the size of tennis balls. Several varieties of potatoes that I planted last year gave us a bumber crop of delicious spuds that we enjoyed all winter. This year, I planted two sweet potato plants that had been started in February from a root purchased at the grocery. We recently harvested over 17 pounds of potatoes from those two plants.

This week, we planted shallots from the grocery. I fully expect we will have good results at harvest time next fall.
So, if you are appalled at the prices being asked for seed potatoes just purchase a few at your local market. Chances are, you will enjoy the same success that Jerry and I have.
Monday, September 26, 2011
Tips For Fall Brassicas
The primary obstacle to the production of a fall crop of broccoli, Brussels sprouts, cabbage or cauliflower is the cabbage butterfly, Pieris rapae. Left unchecked, its caterpillars will ruin the entire crop. For many years, we have used Bt to control cabbage caterpillars organically, with only partial success. In the spring, we brought in a fair crop of broccoli by using Bt and keeping the plants under a floating row cover. However, they seemed to suffer from the additional shading.
We started seeds for fall brassicas on August 19 and transplanted them to the garden on September 12. From past experience, we have learned to start a dozen seeds to obtain three or four healthy transplants. In the past, we tossed the extras into the compost. This year, we left them on the nursery bench as a trap crop. Plants were dusted with Bt from the time they had their first true leaves until transplant time, renewing the Bt after each rain. Newly transplanted plants were also dusted with Bt, but the extras were left untreated. They were heavily damaged by caterpillars, while the plants in the garden seem to have suffered the least damage in our experience.
I hypothesize that the added stress of being confined in the cell trays caused the extra seedlings to signal to the butterflies. However, this was not a controlled experiment, and we may have just gotten lucky. Next year, we will try the same thing in the spring, and see what happens.
Thursday, September 22, 2011
Late Summer Green Bean Harvest Abundant
Wow! Jerry picked about two gallons of beans from a single 3-pole teepee yesterday afternoon. The warm days, cool nights and abundant rain gave us a bumber crop. The cultivar is "Dwarf Horticultural" obtained from our local seed company, Mayo's. The vines are half-runners and would have done better on wire tomato cages than on the poles we gave them this year, but you live and learn. The only problem resulting from inadequate support was that some of the lower beans were curved due to touching the ground. With a better trellis, nearly all the pods would grow straight, about eight inches long.
This bean variety has a long history here in East Tennessee. Also known as "October beans," it is well-adapted to the late-season conditions here. Although delicious as a green bean before the pods swell, most gardeners allow some pods to almost ripen before picking. The harvest, when prepared for cooking, will yeild both green beans and "shellies," almost mature, brownish seeds.
These beans need the "country style" treatment in the kitchen, i.e., long cooking. This is necessary to tenderize the pods and fully cook the matured seeds. October beans are traditionally cooked with bacon, ham hocks or salt pork. They are equally good in a vegan rendition. Here's my recipe:
Vegan Country-Style October Beans
2 quarts October beans, trimmed, strings removed and broken into one-inch pieces
1/2 a medium onion, chopped, about 3/4 cup
2 teaspoons canola oil
6 cups vegetable stock
salt and freshly ground black pepper to taste
Saute the onion in the oil until it begins to color. Add the stock and the beans. Bring to a boil. Reduce the heat, cover and boil gently over medium low heat until the beans are tender, about 45 minutes to one hour. Taste and correct the seasoning. Serve immediately as a side or cool to room temperature, then pack into 2-cup freezer containers and freeze for up to 6 months.
Monday, September 5, 2011
Ending the Season With a Full Pantry

Saturday, August 6, 2011
Pickle Recipes and More
A busy and abundant August has so far given us a surplus of tomatoes and cucumbers. We've canned a bunch of pickles, tomatoes and tomato juice. As promised in the previous post, here are a couple of recipes for using long bringed pickles.
Before you can make pickles from long-brined cucumbers, you need to de-salt them. Remove cucumbers from brine and place in a large container. Cover with cold water, using about four times as much water as cucumbers. Allow to sit 24 hours at room temperature. Change the water every eight hours. Drain and rinse the following day. Proceed with recipe for whatever type of pickles you are making.
For Kosher-style dill pickles:
Use 3 pounds of desalted, long-brined cucumbers. Make a fresh brine consisting of 1 tablespoon pickling salt, 1/2 cup vinegar and 2 quarts water. Stir to disslove the salt. Place cucumbers, 3 tablespoons mixed pickling spices, 3 whole cloves of garlic, 3 bay leaves, a pod of red pepper (cut into one-inch pieces) and three small heads of dill (fresh or dried) into a glass, ceramic, or stainless steel container that will hold at least 3quarts. Weight the cucumbers and spices under a plate. Pour the brine over them, using just enough to cover the plate. Water drawn from the cucumbers will increase the volume of liquid in the container. Cover the container and place in a shady spot at room temperature. Make note of the date.
One week later, drain off the brine into a large stainless steel pot, bring it to a boil and pour over the cucumbers and seasonings. Repeat this procedure once, after a second week has passed. Wait a third week, drain the cucumbers and pack into hot pint jars. Distrubute the garlic, bay leaves, red pepper pieces and dill evenly among the jars. Bring the brine to a boil again and pour over the cucumbers, leaving 1/4 inch head space. Remove air bubbles, adjust caps and process in a boiling water bath for 15 minutes. Yield, about 3 pints.
Using a similar, though shorter, procedure and a different pickling brine, you can prepare delicious sweet pickles.
Place 3 pounds desalted brined cucumbers into a suitable container. In a cheesecloth bag place 2 sticks cinnamon, 1 tablespoon whole cloves and 1/2 teaspoon mace. Tie the bag closed and add it to the container. In another pot, combine 3 1/2 cups sugar and 4 cups vinegar. Bring to a boil and pour over the cucumbers. After 24 hours, drain off the liquid, bring it to a boil again, and pour over the cucumbers and spice bag. After another 24 hours, repeat. After a third day has passed, drain again, pack the cucumbers into hot pint jars and bring the liquid to a boil again. Discard the spice bag and pour the hot liquid over the cucumbers, leaving 1/4 inch head space. Adjust the caps and process 15 minutes in a boiling water bath.
The seasonings in these recipes are traditional but may be varied to suit your taste or whim, as long as the ratios of water, vinegar, salt and sugar are maintained.
Bon appetit!
Before you can make pickles from long-brined cucumbers, you need to de-salt them. Remove cucumbers from brine and place in a large container. Cover with cold water, using about four times as much water as cucumbers. Allow to sit 24 hours at room temperature. Change the water every eight hours. Drain and rinse the following day. Proceed with recipe for whatever type of pickles you are making.
 |
| Homemade pickles, one of summer's delights. |
For Kosher-style dill pickles:
Use 3 pounds of desalted, long-brined cucumbers. Make a fresh brine consisting of 1 tablespoon pickling salt, 1/2 cup vinegar and 2 quarts water. Stir to disslove the salt. Place cucumbers, 3 tablespoons mixed pickling spices, 3 whole cloves of garlic, 3 bay leaves, a pod of red pepper (cut into one-inch pieces) and three small heads of dill (fresh or dried) into a glass, ceramic, or stainless steel container that will hold at least 3quarts. Weight the cucumbers and spices under a plate. Pour the brine over them, using just enough to cover the plate. Water drawn from the cucumbers will increase the volume of liquid in the container. Cover the container and place in a shady spot at room temperature. Make note of the date.
One week later, drain off the brine into a large stainless steel pot, bring it to a boil and pour over the cucumbers and seasonings. Repeat this procedure once, after a second week has passed. Wait a third week, drain the cucumbers and pack into hot pint jars. Distrubute the garlic, bay leaves, red pepper pieces and dill evenly among the jars. Bring the brine to a boil again and pour over the cucumbers, leaving 1/4 inch head space. Remove air bubbles, adjust caps and process in a boiling water bath for 15 minutes. Yield, about 3 pints.
Using a similar, though shorter, procedure and a different pickling brine, you can prepare delicious sweet pickles.
Place 3 pounds desalted brined cucumbers into a suitable container. In a cheesecloth bag place 2 sticks cinnamon, 1 tablespoon whole cloves and 1/2 teaspoon mace. Tie the bag closed and add it to the container. In another pot, combine 3 1/2 cups sugar and 4 cups vinegar. Bring to a boil and pour over the cucumbers. After 24 hours, drain off the liquid, bring it to a boil again, and pour over the cucumbers and spice bag. After another 24 hours, repeat. After a third day has passed, drain again, pack the cucumbers into hot pint jars and bring the liquid to a boil again. Discard the spice bag and pour the hot liquid over the cucumbers, leaving 1/4 inch head space. Adjust the caps and process 15 minutes in a boiling water bath.
The seasonings in these recipes are traditional but may be varied to suit your taste or whim, as long as the ratios of water, vinegar, salt and sugar are maintained.
Bon appetit!
Sunday, July 24, 2011
Pickling To Preserve Summer Bounty
Abundant rainfall and uncommonly hot weather have led to a surplus of cucumbers in our garden. We grew three hill of 'Pickalot' from Burpee. The vines are supported on a nylon string trellis and have certainly lived up to the cultivar name.
We selected three pounds of the best ones from our earliest picking to prepare my grandmother's sweet chunk pickles. This is a long-brined recipe that has been in my family for generations. The cucumbers remain in brine for three weeks before being transferred to a solution of vinegar, sugar and spices.
Long-brined pickles were once a staple of the American diet. Once the brining process is complete, the pickles can sit in the brine at room temperature for months without deterioration. This feature allowed them to be shipped in barrels via rail to even remote reaches of the country, and the pickle barrel became a fixture in nearly every general store.
The long-brining technique can be used to advantage on the new American homestead. In our case, for example, with only three vines, we need to harvest cucumbers over a period of about three days in order to accumulate five pounds for a batch of pickles. With long-brining, you can add cucumbers to the brine over a three day period, provided you also add more salt to compensate for the weight of added cucumbers.
If you want to try long-brined pickles yourself, start by choosing an appropriate vessel. You need a food-safe, non-reactive container holding three to five gallons, along with a plate that will fit snugly inside the container. The plate is used to weight down the cumumbers to keep them underneath the surface of the brine at all times.
The brine is a 10 percent salt solution made by dissolving 1 cup of pickling salt in 1 quart of water. It is important to use salt labeled for pickling. It has been purified and dissolves quickly. The water should be soft. In hard water areas, use distilled water. Water can be softened by boiling it for 15 minutes and then allowing it to sit undisturbed overnight. The scum that appears on the top should be carefully removed by repeatedly dragging the edge of a paper towel across the surface. The scum will adhere to the towel. You can tear off a strip to expose a fresh edge and repeat as needed. Carefully ladle the water out of the pot, leaving any bottom sediment undisturbed. [Note: in my view, the energy used and the effort required to soften water by this method are probably much greater than needed to produce an equivalent quantity of distilled water. Therefore, if you can afford the modest cost, use distilled water.]
Carefully wash freshly harvested cucumbers and inspect them carefully. Do not use any that have insect damage, etc. Weigh your harvest and make a note of the weight and date. Prepare sufficient brine to cover the cucumbers and place them in your pickling container. Pour the brine over and weight them down with the plate. Make sure all the cucumbers are completely submerged. Place the container in a cool, shady location.
If additional cucumbers are added over the next two days, be sure to:
On day three, add one cup salt for each five pounds of cucumbers from days one and two. Do this after placing any additional cucumbers and brine into the container. Do not add any more cucumbers after today.
On day four, add one cup salt for each five pounds total weight of cucumbers from days one, two and three. Always add the salt on top of the plate, allowing it to slowly dissolve into the brine.
NOTE: Scum will form on the surface of the brine as the cucumbers ferment. Carefully remove the scum with a skimmer or metal kitchen spoon. If allowed to remain, the scum will spoil the pickles.
On day seven, add 1/4 cup additional salt for each five pounds total weight of cucumbers. Continue to remove scum as it forms.
On days fourteen, twenty-one, twenty-eight, thirty-five and possibly forty-two (that is, at the end of each subsequent week for the next 4-5 weeks) add 1/4 cup of salt for each five pounds total weight of cucumbers.
During the second and subsequent weeks, the pickles will ferment. This will result in the production of carbon dioxide in the form of bubbles that will slowly rise to the top of the container. If you tap on the sides of the container with your hands, you should dislodge bubbles, making them easier to observe.
After four weeks of fermentation, check a cucumber by cutting it in half crosswise. It should be of uniform coloration throughout, there should be no white spots nor the appearance of dark rings. If necessary, allow the pickles to cure another week after adding the requisite amount of salt.
Once the pickles are cured, they may be left in the brine at room temperature for several months without deterioration. When needed, the pickles may be removed from the brine, desalted and packed with vinegar, sugar and spices to produce a variety of products from sour to sweet.
In the next post, I'll share some recipes for using long-brined cucumbers to make pickles.
 |
| 'Pickalot' produces abundant cukes ideal for pickling. |
Long-brined pickles were once a staple of the American diet. Once the brining process is complete, the pickles can sit in the brine at room temperature for months without deterioration. This feature allowed them to be shipped in barrels via rail to even remote reaches of the country, and the pickle barrel became a fixture in nearly every general store.
The long-brining technique can be used to advantage on the new American homestead. In our case, for example, with only three vines, we need to harvest cucumbers over a period of about three days in order to accumulate five pounds for a batch of pickles. With long-brining, you can add cucumbers to the brine over a three day period, provided you also add more salt to compensate for the weight of added cucumbers.
If you want to try long-brined pickles yourself, start by choosing an appropriate vessel. You need a food-safe, non-reactive container holding three to five gallons, along with a plate that will fit snugly inside the container. The plate is used to weight down the cumumbers to keep them underneath the surface of the brine at all times.
The brine is a 10 percent salt solution made by dissolving 1 cup of pickling salt in 1 quart of water. It is important to use salt labeled for pickling. It has been purified and dissolves quickly. The water should be soft. In hard water areas, use distilled water. Water can be softened by boiling it for 15 minutes and then allowing it to sit undisturbed overnight. The scum that appears on the top should be carefully removed by repeatedly dragging the edge of a paper towel across the surface. The scum will adhere to the towel. You can tear off a strip to expose a fresh edge and repeat as needed. Carefully ladle the water out of the pot, leaving any bottom sediment undisturbed. [Note: in my view, the energy used and the effort required to soften water by this method are probably much greater than needed to produce an equivalent quantity of distilled water. Therefore, if you can afford the modest cost, use distilled water.]
Carefully wash freshly harvested cucumbers and inspect them carefully. Do not use any that have insect damage, etc. Weigh your harvest and make a note of the weight and date. Prepare sufficient brine to cover the cucumbers and place them in your pickling container. Pour the brine over and weight them down with the plate. Make sure all the cucumbers are completely submerged. Place the container in a cool, shady location.
If additional cucumbers are added over the next two days, be sure to:
- Weigh them first and make note of the weight and date.
- Add enough 10 percent brine to cover them.
- Take the added weight into consideration when adding salt (see below)
On day three, add one cup salt for each five pounds of cucumbers from days one and two. Do this after placing any additional cucumbers and brine into the container. Do not add any more cucumbers after today.
On day four, add one cup salt for each five pounds total weight of cucumbers from days one, two and three. Always add the salt on top of the plate, allowing it to slowly dissolve into the brine.
NOTE: Scum will form on the surface of the brine as the cucumbers ferment. Carefully remove the scum with a skimmer or metal kitchen spoon. If allowed to remain, the scum will spoil the pickles.
On day seven, add 1/4 cup additional salt for each five pounds total weight of cucumbers. Continue to remove scum as it forms.
On days fourteen, twenty-one, twenty-eight, thirty-five and possibly forty-two (that is, at the end of each subsequent week for the next 4-5 weeks) add 1/4 cup of salt for each five pounds total weight of cucumbers.
During the second and subsequent weeks, the pickles will ferment. This will result in the production of carbon dioxide in the form of bubbles that will slowly rise to the top of the container. If you tap on the sides of the container with your hands, you should dislodge bubbles, making them easier to observe.
After four weeks of fermentation, check a cucumber by cutting it in half crosswise. It should be of uniform coloration throughout, there should be no white spots nor the appearance of dark rings. If necessary, allow the pickles to cure another week after adding the requisite amount of salt.
Once the pickles are cured, they may be left in the brine at room temperature for several months without deterioration. When needed, the pickles may be removed from the brine, desalted and packed with vinegar, sugar and spices to produce a variety of products from sour to sweet.
In the next post, I'll share some recipes for using long-brined cucumbers to make pickles.
Tuesday, July 19, 2011
Summer Veggies Star Several Ways
Having recovered from the stress of multiple family issues this spring, we are back and ready to continue blogging.
This summer has been a productive one in the garden, despite our having significantly less time to devote to planting and caring for it. Mother Nature has been cooperative, though, with abundant rainfall. We received over nine inches during the month of June, alone.
Now that we're past the Fourth of July, the summer garden is in full swing. For us, success in summer is having all the vegetables and herbs necessary to prepare a batch of gazpacho. Undoubtedly, this is our favorite summer dish, and it is surprisingly versatile.
Gazpacho starts out like a summer salad that has long been a family favorite: chopped tomatoes, cucumbers, green peppers and onions. Sprinkle the vegetables with a little salt a pepper, drizzle white wine vinegar over them sparingly, and chill until ready to serve or overnight. Serve drizzled with a little olive oil and grated parmesan.
If you chop the vegetables more finely, into quarter-inch dice, add minced parsley and mint and substitute lemon juice for the wine vinegar, you have an Israeli salad. Increase the olive oil from a drizzle to about two tablespoons per serving.
To the Israeli salad, add a minced clove of garlic, a teaspoon or more of paprika, and substitute basil and tarragon for the mint. Keep the total amount of fresh herbs to about 1/2 cup, roughly half of which should be parsley. Increase the olive oil to 3 tablespoons per serving. Stir in two tablespoons of fine dry bread crumbs. This mixture, which should age in the refrigerator for at least an hour or two before serving, is the basis for gazpacho.
To finish the gazpacho, add chilled tomato juice, vegetable stock or chicken stock until you have the consistency you desire. Any number of garnishes may be used, including diced colored bell peppers, diced red onions, sweet corn kernels, minced fresh herbs, croutons, chopped hard cooked eggs, shredded cheese, sour cream and/or cooked seafood.
For any of these dishes, the proportions for four servings are:
3 medium fresh tomatoes
2 6-inch cucumbers, peeled (if desired) and seeded
1 small red onion
1/2 medium green bell pepper, seeded
1 clove garlic (if using)
2 tablespoons vinegar or juice of one lemon
1 teaspoon salt
1/4 teaspoon freshly groubd black pepper
Feel free to vary the proportions depending upon what you have available. The salad/gazpacho will still taste fabulous.
From the simple chopped salad to an elaborate first course suitable for guests, the versatile combination of tomatoes, cucumbers, peppers, onions and herbs stars on the summer menu. When you have all these veggies fresh from the garden, the flavor is incomparable. Bon appetit!
Wednesday, March 23, 2011
Please Bear With Us
Dear Readers,
Please forgive the long silence, and please bear with us as we deal with the death of one parent and the serious illness of another.
Thanks for your patience,
John
Please forgive the long silence, and please bear with us as we deal with the death of one parent and the serious illness of another.
Thanks for your patience,
John
Sunday, February 20, 2011
"F minus 60" Eight Weeks to Last Frost
Today marks "F minus 60" or sixty days until the last expected frost here in Zone 6. I used information from the weather service to decide on the most likely frost free date for my garden, April 20. Because altitude, exposure and the direction of prevailing winds can all influence the microclimate of your property, determining the frost date is never an exact science. I looked at data from the three nearest weather stations, and made my best guess. You can find raw frost probability data for all National Weather Service reporting stations at the National Climate Data Center. You'll bring up a PDF of probability tables that can be a bit confusing. If you want help with the interpretation, try using the tool for finding frost free dates by zip code at Dave's Garden.
Today we transplanted lettuces and broccoli. The broccoli plants, 'De Cicco' cultivar, were started under lights on January 3. According to Southern Exposure Seed Exchange, this broccoli was introduced around 1890 and is known for producing abundant side shoots after the main head is harvested. The 15 best plants went into a raised bed outfitted with supports for floating row cover. The row cover will provide a little frost protection, but is mainly there to prevent access to the plants by cabbage butterflies, which will be on the prowl before the broccoli heads up. If the weather threatens to get really cold, we can always apply plastic film on top of the row cover. The local forecast calls for relatively mild weather for the next week, which should give the plants a chance to establish themselves before the next chill. We expect to harvest a crop around April 10.
 The row cover support is made of 3/4 inch EMT conduit. It is easy to work with, costs little and lasts for many seasons with proper care.
We are also using row cover to protect our early lettuce transplants. Seeds were started January 9, and include 'Buttercrunch,' 'Lollo Rossa,' and 'Rougette de Montpelier.' Experience has taught that all of these have good cold tolerance. We bent some plastic-coated metal plant stakes to make supports holding the row cover fabric just above the lettuce leaves.

Today we transplanted lettuces and broccoli. The broccoli plants, 'De Cicco' cultivar, were started under lights on January 3. According to Southern Exposure Seed Exchange, this broccoli was introduced around 1890 and is known for producing abundant side shoots after the main head is harvested. The 15 best plants went into a raised bed outfitted with supports for floating row cover. The row cover will provide a little frost protection, but is mainly there to prevent access to the plants by cabbage butterflies, which will be on the prowl before the broccoli heads up. If the weather threatens to get really cold, we can always apply plastic film on top of the row cover. The local forecast calls for relatively mild weather for the next week, which should give the plants a chance to establish themselves before the next chill. We expect to harvest a crop around April 10.

We are also using row cover to protect our early lettuce transplants. Seeds were started January 9, and include 'Buttercrunch,' 'Lollo Rossa,' and 'Rougette de Montpelier.' Experience has taught that all of these have good cold tolerance. We bent some plastic-coated metal plant stakes to make supports holding the row cover fabric just above the lettuce leaves.
You can see one of the supports in the middle of the image. Lollo Rossa is on the left and Buttercrunch on the right. These lettuces should be ready to harvest in about two weeks. We have new seedlings coming along to replace them. By mid-March, the bed will no longer need a row cover.
This week in the kitchen I am experimenting with making kimchi. Creating this fermented Asian condiment offers a great way to preserve winter greens. The recipe I am using calls for napa cabbage, which is typically found in commercial kimchi products. I always think it is a good idea to start with a more or less standard method when learning a new kitchen craft. Research reveals that many recipes for kimchi exist, exploiting various green crops and utilizing an assortment of flavorings and techniques. I was unable to find some of the ingredients called for in the recipe, which appears in the February/March 2011 issue of Fine Cooking. Therefore, I made substitutions. I also reduced the quantity by three-fourths. No sense making a huge amount until you know you like the result. I will post my recipe after we've sampled the product. Kimchi, like its relative sauerkraut, has many uses in the kitchen. Having a supply on hand makes a quick Asian meal easy to whip up on a weeknight. With refrigeration, it keeps a month or more.
The Vernal Equinox is March 20...only 28 days to go. Happy growing!
Sunday, February 13, 2011
The Starving Moon
The Cherokee who lived here 600 years ago called February "The Starving Moon." By now, stocks of stored foods ran low. The harsh weather kept new growth dormant. Game scurried wary and thin.
Small surprise that fresh local food is scarce in the market. Fresh basil, dill and mint, sprouts of various kinds and storage foods like sweet potatoes and winter squash were all I found this week. The freezer case contained frozen beef from two local producers, Mitchell Farm in Blaine, and Three Forks Cattle Company in Pall Mall, TN. The market also now stocks fresh milk from Cruze Dairy, located in Knoxville. The dairy raises grass-fed Jersey cows and produces milk that reminds me of my childhood on the farm. Local cheeses from Sweetwater Valley and Locust Grove round out the offerings.
With a bit of technology, the menu could be much more varied, however. Our simple cold frame protects chervil, lettuce, spinach and tatsoi. With a larger protected growing space and better planning, we could have a much bigger harvest. I am surprised that local farmers have not followed in the footsteps of Elliot Coleman, farmer, inventor and author. Coleman profitably produces vegetables for sale year round on the coast of Maine (Zone 5). Surely, we can do the same in our milder climate.
Another way, of course, to have local food during the depths of winter is to preserve as much of the seasonal harvest as possible. Over the years we have learned that the best approach involves two critical planning steps:
1) Choose preservation methods suited to the food you plan to grow.
2) Decide how much of each food product you can use during the cold months.
Now is a good time to research methods and make plans for preserving an abundant harvest during the coming season.
Do not rely on only one method of preservation for a given crop, where that is possible. Tomatoes, for example, can be frozen or canned. You get different results that are suited to different applications in the kitchen. Frozen tomatoes are easy to prepare, convenient when used and excellent in cooked dishes or sauce. Canned tomatoes retain some of their texture and can be drained and used like fresh tomatoes in salsa or on a salad. They can also be used, of course, in cooking.
For preserved foods that are seasoned and cooked, make more than one recipe. Cucumber pickles can be dilled, sweet, bread-and-butter, etc. Having this kind of variety available in the winter pantry helps you create more interesting menus to stave off the winter blues.
Saturday, February 5, 2011
Starting Seeds Indoors Under Lights
Garden center prices for vegetable starts are expected to be at an all time high this year, due to increased demand from gardeners and higher fuel costs for growers. That is why it makes sense to start your own at home. You can buy seed starting supplies anywhere seeds are sold, or use almost any type of container to hold them until they are ready for the garden. For most people, however, the biggest obstacle to starting seeds early is the availability of a sufficiently well-lighted growing space. Fluorescent lighting provides the best option for indoor growing for home gardeners.
We already have flats of seeds growing under lights in the garage. A second round of lettuce will be ready to move into the cold frame in a week or so. Broccoli, leeks and even some experimental tomato plants are thriving. The garage has two south-facing windows, each about 36 inches wide. In front of each of these we have set up a baker's rack measuring approximately four feet wide by 18 inches deep. Four foot fluorescent shop lights, each holding two 40-watt fluorescent lamps, hang from the shelves on chains. We have found that three shop lights (a total of six lamps) per shelf provides sufficient light for all types of vegetables. If one were only going to grow greens, you could probably get by with only two units (four lamps) per shelf.
I bought "cool white" lamps, because they are the least expensive, a little less than a dollar apiece when purchased in a case of ten. At 3100K they are not exactly the ideal color temperature for plant production. Daylight lamps, at about 5000-6000K would provide more energy in the areas of the color spectrum that plants absorb. However, we have achieved satisfactory results with the cool whites, and the daylight lamps are considerably more costly.
Standard seed flats are 10 inches wide by 20 inches long. Four will fit across each shelf, for a total of 16 flats per rack. If we use 36-cell trays for starting seeds, which we do for lettuce, we can accommodate a total of 576 plants per rack or 1152 plants between both racks.
The shop lights are relative cheap, about $10 each. We have 12 per rack, so the total cost is about $240 for the light fixtures. The racks themselves we have had a long time. You can purchase similar ones for about $50 each. Add another $25 for timers and extension cords, and the total cost of the set-up is about $375. Allowing $1.00 each for lamps, we have $48 invested in that component. The lamps will last two seasons before they dim enough to need replacement, but the other components will last through many growing seasons. Given that a small greenhouse costs close to $1000, our garage system seems like a bargain-priced way to start a modest number of vegetable plants. If it lasts us for only 5 years, the equipment amortized cost is $6.55 per month, plus another $2.40 per month for lamps. The amortized cost for a $1000 greenhouse is twice that.
How much is it costing us to operate our indoor garden? Our garage is well-insulated, and we heat it to about 60 degrees with an oil-filled radiator heater. Since we use it for many types of projects, we don't count the cost of heating in our calculations for plant production. The cost of lighting is easy to calculate. We have 48 lamps at 40 watts each. That is 1920 watts. If we operate them for 12 hours per day, we use just a shade over 23 kilowatt-hours of electricity. At our present rate, a kilowatt-hour costs nine cents, so the light system is consuming $2.07 per day, or $62.10 per month, in electricity. At most, we will use it for three months, for a total of $186.30 in operating expenses. This is far less than the value of the vegetables we will produce from the plants we are growing now. A small greenhouse, by contrast, would cost more just to heat, depending upon the heat source, and might actually need supplemental lighting during the shortest winter days.
Any way you look at it, the indoor garden seems like a more affordable option than a small greenhouse.
Obviously, not everyone will need to start more than 1000 vegetable plants, and not everyone will want to invest this much in equipment. Nevertheless, it is easy to see that you can devise an indoor light garden with simple, out-of-the-box equipment. If all you want is two or three tomato plants and some lettuce, you can start enough plants underneath a single shoplight, and the cost will be less than $25 for the whole season.
Friday, January 28, 2011
This Week's Local Food Finds
A new shipment of winter squash has arrived from South Carolina. Otherwise, the local food scene this week is not much different from what we found in December. Apples from Hendersonville, NC, ginger from Alabama, and fresh herbs and sprouts from Nashville. Sweet potatoes from Georgia and Grainger County, TN, and as always delicious locally baked breads to go with cheeses from Locust Grove and Sweetwater Valley Farms.
The find of the month, however, has been sitting there on the shelf waiting for me every since last fall. White paper bags containing four pounds of organically grown, stone ground, one hundred percent Hickory King corn meal.
If you are not familiar with Hickory King corn, you should be. It is a "flint" type corn, with far less sugar than the sweet corn varieties most people grow in their gardens. It has been a southern favorite for a long time, since before 1875 according to Southern Exposure Seed Exchange. (This company has one of my favorite catalogs of heirloom and organic vegetable seeds.) Not only does this corn make great roasting ears, it is preferred by many for hominy, grits and corn meal. Unfortunately, it is a bit unwieldy for the home garden. The stalks, which typically bear two ears each, grow up to twelve feet tall. Thus, I will leave it to Lakeview Farm in Bean Station, TN, to continue producing Hickory King corn meal. It makes the best cornbread I have tasted since childhood. The recipe that is printed on the bag from Lakeview Farm might be a little hard for inexperienced cooks to follow, so I have included some additional instructions.
Hickory King Corn Bread
2 cups stone ground Hickory King corn meal
1 teaspoon baking soda
1 teaspoon sea salt
2 cups buttermilk
1 large egg
1 tablespoon unsalted butter, melted
Preheat the oven to 400 degrees F. Combine the dry ingredients in a mixing bowl. Stir well with a wire whisk. In a separate bowl, whisk the buttermilk, egg and melted butter until thoroughly blended. Make a well in the center of the dry ingredients, dump in the liquid and whisk to make a uniform batter. Grease a 10 inch diameter cast iron skillet. Pour in the batter, place in the oven and bake until golden brown on top, about 30-35 minutes.
Leftovers (if any) make delicious dressing, I discovered. Next, I am going to use this meal to prepare cornbread according to my old recipe, which calls for self-rising corn meal mix. Ever since the local White Lily Milling Company retired its "Three Rivers" brand of cornmeal mix, I've been looking for a replacement, without much success.
John's Cornbread
1/2 cup unbleached all purpose flour
1 1/2 cups Hickory King corn meal
3/4 teaspoon salt
2 1/2 teaspoons double-acting baking powder
2 large eggs
2 tablespoons vegetable oil, plus more for the skillet
1 1/2 cups 2% milk
Preheat the oven to 425 degrees F. Pour enough oil in the bottom of a 10-inch cast iron skillet to coat it well. Place the skillet in the oven to heat while you make the cornbread. In a mixing bowl combine the dry ingredients and whisk to produce a uniform mixture. Whisk the remaining ingredients in a separate bowl until they are well combined. Make a well in the center of the dry ingredients and pour in the liquid. Whisk just enough to fully incorporate the liquid. Carefully remove the hot skillet from the oven and pour the batter into it. The skillet should be hot enough that the batter sizzles. Return the skillet to the oven and bake until the top is golden brown and the cornbread has pulled away slightly from the sides of the skillet, about 30-40 minutes.
Enjoy!
Sunday, January 23, 2011
Start With Lettuce
If you are just getting started with food gardening, I suggest you try lettuce as your first crop. Lettuce is a cool weather crop that is easy to grow. It is almost always eaten fresh and uncooked, and costs more per pound in the market than the majority of other vegetables. It makes good sense, therefore, to grow lettuce at home. The plants grow well in containers and will tolerate some shade, making lettuce a good choice for balcony and patio container gardens. Most lettuce cultivars are ready to harvest within two months. By succession planting, you can have lettuce ready to pick during all but the warmest period of your growing season.
Lettuce will also grow satisfactorily in a solar cold frame throughout the winter here in Zones 7 or 6. (We live right on the transition between these two climate zones, with weather that is typically a few degrees cooler than nearby Knoxville, which is about 300 feet lower in elevation and near the Tennessee River.) One of our major projects for the coming season is constructing a small solar greenhouse for winter vegetable production.
Right now, however, we're gearing up for the coming Spring by starting our earliest cool season crops in the garage under lights. Here's a view of the setup.
On the left are lettuce plants started in November, 2010. They went into the cold frame bed today, and should produce an early crop as soon as the day length increases sufficiently. That two months were required for the plants to reach this size demonstrates how the availability of light controls plant growth, even in the absence of below-freezing temperatures. We tend to regard the difficulties of winter cultivation as due entirely to the cold, but plants also need adequate light. This explains why a solar greenhouse will give better results than an indoor system. Even with the sun's illumination, however, some crops require supplemental lighting to produce in wintertime.
Lettuce Cultivars
We've scarcely met a lettuce we don't like and have grown many over the years. We currently have plants of the following:
Lollo Rossa - Frilly, almost lacy, looseleaf with pale green and bronze coloration. Good for cut and come again harvest; produces well in the cold frame.
Red Romaine - One of our favorites. Deep red, loose head of elongated leaves with succulent, sweet ribs. Grows well in all seasons except the warmest part of summer.
Rouge d'Hiver - Green and red looseleaf type selected for overwintering under cover. Does poorly in warm weather. Beautiful leaves are tender and sweet.
Rougette de Montpelier - Buttercrunch type with red and green coloration. Good producer fall through early spring. Individual heads just right for one serving of salad.
We find that red pigmented lettuces do better for us in winter than green ones do.
Lettuce seeds keep several years with proper storage. We have the following in our inventory, awaiting longer, warmer days:
Black Seeded Simpson - Pale yellow-green heirloom looseleaf type that was my grandfather's choice. I grow some every year for the nostalgia alone. Easy and reliable mid spring crop that does well in a large container, too.
Buttercrunch - Deep green butterhead with yellow center and fabulous flavor. Best in early spring from seed started indoors. Needs coddling for best quality.
Oakleaf - Pale green loosehead with interesting leaf shapes. Delicious and reliable as a spring crop.
Red Salad Bowl - Bright crimson looseaf type that makes a perfect companion for Black Seeded Simpson, whether in the ground or in a container.
Two varieties we are going to try this year, both from Burpee, are:
Ashley - Supposedly heat tolerant red loosehead with ruffled leaves.
Freckles - Another (supposedly) heat tolerant lettuce, this is a Romaine type sporting bright green leaves with red freckles.
Others we may try:
Little Gem - Baby green romaine type good for containers. We had good luck with mid-spring sowing of this one.
Thai Oakleaf - Bred to take the heat, this cultivar is available from Southern Exposure.
Tom Thumb - Makes a perfect little butterhead the size of a tennis ball. Too cute to pass up and ideal in containers. Early spring cropping is most successful.
Easy to grow and decorative, lettuce ranks highly for backyard gardens large or small.
Lettuce will also grow satisfactorily in a solar cold frame throughout the winter here in Zones 7 or 6. (We live right on the transition between these two climate zones, with weather that is typically a few degrees cooler than nearby Knoxville, which is about 300 feet lower in elevation and near the Tennessee River.) One of our major projects for the coming season is constructing a small solar greenhouse for winter vegetable production.
Right now, however, we're gearing up for the coming Spring by starting our earliest cool season crops in the garage under lights. Here's a view of the setup.
 |
| Seed flats get light from shop lights and a south facing window. |
Lettuce Cultivars
We've scarcely met a lettuce we don't like and have grown many over the years. We currently have plants of the following:
Lollo Rossa - Frilly, almost lacy, looseleaf with pale green and bronze coloration. Good for cut and come again harvest; produces well in the cold frame.
Red Romaine - One of our favorites. Deep red, loose head of elongated leaves with succulent, sweet ribs. Grows well in all seasons except the warmest part of summer.
Rouge d'Hiver - Green and red looseleaf type selected for overwintering under cover. Does poorly in warm weather. Beautiful leaves are tender and sweet.
Rougette de Montpelier - Buttercrunch type with red and green coloration. Good producer fall through early spring. Individual heads just right for one serving of salad.
 |
| All these lettuce plants will get darker when moved to the cold frame. |
We find that red pigmented lettuces do better for us in winter than green ones do.
Lettuce seeds keep several years with proper storage. We have the following in our inventory, awaiting longer, warmer days:
Black Seeded Simpson - Pale yellow-green heirloom looseleaf type that was my grandfather's choice. I grow some every year for the nostalgia alone. Easy and reliable mid spring crop that does well in a large container, too.
Buttercrunch - Deep green butterhead with yellow center and fabulous flavor. Best in early spring from seed started indoors. Needs coddling for best quality.
Oakleaf - Pale green loosehead with interesting leaf shapes. Delicious and reliable as a spring crop.
Red Salad Bowl - Bright crimson looseaf type that makes a perfect companion for Black Seeded Simpson, whether in the ground or in a container.
Two varieties we are going to try this year, both from Burpee, are:
Ashley - Supposedly heat tolerant red loosehead with ruffled leaves.
Freckles - Another (supposedly) heat tolerant lettuce, this is a Romaine type sporting bright green leaves with red freckles.
Others we may try:
Little Gem - Baby green romaine type good for containers. We had good luck with mid-spring sowing of this one.
Thai Oakleaf - Bred to take the heat, this cultivar is available from Southern Exposure.
Tom Thumb - Makes a perfect little butterhead the size of a tennis ball. Too cute to pass up and ideal in containers. Early spring cropping is most successful.
Easy to grow and decorative, lettuce ranks highly for backyard gardens large or small.
Thursday, January 13, 2011
What We Could Be Growing Now
January's cold, gray weather often keeps us indoors, so we make good use of the time by developing a garden plan for the coming year. Over time I have learned that planning a summer garden is relatively easy, while spring, fall and especially winter vegetable gardens are more challenging.
One trick I have learned for planning a winter garden is to make a list of vegetables I could be enjoying now, had I planned better last year. For example, I really should have potted up more rosemary to bring inside, as we have harvested all we dare from the one plant we saved. In fact, I intend to create a indoor herb garden for next winter by growing my favorite herbs in containers planted around the first of June. These won't be picked all summer, as we will have plenty of herbs in the garden beds, then. A month before bringing the pots inside, I'll give them all a good pruning, and use or dry the cuttings. That should cause them to put on new growth before they come inside around the end of October. My aim is to bring them indoors just before the first hard freeze. Besides French thyme, Greek oregano and rosemary, my three kitchen staples, I will certainly have a pot or two of parsley.
Because it tolerates some shade, parsley is excellent for growing in a windowsill garden. You can start plants just for the purpose, sowing seeds around the first of June, or in the fall dig a plant out of the garden and pot it up. Use a the largest pot you can manage, and feed the plant a soluble fertilizer to encourage plenty of foliage growth.
Coldframe Crops
With a larger coldframe we could be producing taller plants all winter. With more square feet under plastic, we could easily grow all the cilantro, parsley, dill, chervil, beets, Swiss chard, carrots, corn salad, arugula, mizuna, tatsoi, bak choi, chives, lettuce, scallions and leeks we could use. This is an area I intend to give more effort to during the 2011 growing season. Besides crops that are harvested in winter, cultivars selected for their ability to overwinter and produce a crop very early are worth some experimentation.
Storage Crops
The next best thing to fresh, homegrown produce is produce that has been preserved at home, captured at the peak of flavor. Freezing is the main way I preserve fresh veggies, but I also make pickles. Next season, I may purchase a pressure canner and expand my options in the canning realm. Also, I hope to take advantage of seasonal abundance at the Farmer's Market to put up my own tomatoes, fruit preserves and jam.
The garden will have some space devoted to storage crops, a bit more than last year. Potatoes, garlic and shallots are the main ones, and we plan to experiment with perennial onions. They have to be fall planted, though, so we will not see results during 2011.
Root cellar crops, such as beets, carrots, cabbage and turnips, are also on our list. Another possibility is sweet potatoes, although they take up quite a bit of room in the garden. I seldom see my favorite type, the true yam or "white sweet potato" that my grandfather grew, although they turn up from time to time at the Farmer's Market. If I can find some plants, I'll make room for them. Otherwise, I'll rely on the Farmer's Market for sweet potatoes, along with winter squash and pumpkins. Squash family crops typically outgrow our space and many are beset by the squash vine borer, a serious pest.
New Introductions
One of our main garden goals for 2011 is to establish a berry patch. We want to grow our own strawberries, raspberries, and possibly blueberries. We will include progress reports on this and other projects in future posts.
Saturday, January 8, 2011
2010 Harvest Data
I finally managed to record all the raw data from last year's harvest in a spreadsheet. As usual, I am amazed at the quantity of food we can produce. Our vegetable garden consists of five raised beds made of pressure treated 2 x 12s. Three beds are15 square feet each, two are 16 square feet each, and the other is 32 square feet. We also have a permanent bed along one side of the house that is about 48 square feet total. This latter bed mostly held annual herbs and members of the onion family in 2010.
Here's what we harvested:
Beans, snap-23 pounds, most of which we froze
Cucumber-24 pounds
Leeks-36 mature plants, 1-1/4 inch in diameter, about 6 pounds total
Peas, snap-4 pounds, plus a smaller fall crop that was not recorded
Potatoes-17 pounds
Tomatoes-22 pounds, and this was a poor year for tomatoes
Squash, summer-4 pounds
Total Harvest: over 100 pounds of homegrown food!
In addition to these vegetables, we also harvested spinach, scallions, lettuce, mizuna, parsley, chervil, cilantro, dill, basil, thyme, oregano, rosemary and chives in abundance, though I did not keep records on these crops. I plan to improve my record-keeping for the 2011 season.
Growing Underway for 2011
For us the gardening season begins in January. We have sown leeks, broccoli and lettuce indoors for transplanting in February or March. The broccoli and lettuce are already up and growing with fluorescent lamps supplementing the sunlight they receive from a south-facing window in the garage.
 Ginger plants are growing alongside orchids in the master bath, where the warm, humid conditions and a large, bright window facilitate cultivating tropical plants. Currently in 12-inch pots, the ginger will move to a garden bed after Memorial Day, when the weather outside will be warm enough. I plan to experiment with other tropical food plants, and will post the results. If you want to try ginger yourself, it couldn't be easier. I just pick a healthy-looking rhizome from the grocery, break it into chunks with about 3 "toes" each, and pot it up. The photo above shows a 12-inch pot with two pieces of ginger root, ready to be covered with additional potting mix. Below is the same pot after 62 days of growth.

Here's what we harvested:
Beans, snap-23 pounds, most of which we froze
Cucumber-24 pounds
Leeks-36 mature plants, 1-1/4 inch in diameter, about 6 pounds total
Peas, snap-4 pounds, plus a smaller fall crop that was not recorded
Potatoes-17 pounds
Tomatoes-22 pounds, and this was a poor year for tomatoes
Squash, summer-4 pounds
Total Harvest: over 100 pounds of homegrown food!
In addition to these vegetables, we also harvested spinach, scallions, lettuce, mizuna, parsley, chervil, cilantro, dill, basil, thyme, oregano, rosemary and chives in abundance, though I did not keep records on these crops. I plan to improve my record-keeping for the 2011 season.
Growing Underway for 2011
For us the gardening season begins in January. We have sown leeks, broccoli and lettuce indoors for transplanting in February or March. The broccoli and lettuce are already up and growing with fluorescent lamps supplementing the sunlight they receive from a south-facing window in the garage.


Monday, January 3, 2011
New Year's Resolutions
Our New Year's resolutions for the New American Homestead:
1. I will not again plant more stuff than I can take care of.
2. I will take care of all the stuff I plant.
3. I will stick to my garden plan.
4. I will make a garden plan.
5. I will not order more seeds in January than I can sow in June.
6. I will win the annual battle with squash borers.
7. I will not buy any more flower plants on impulse.
8. I will faithfully keep my garden journal.
9. I will freeze, can, dry, pickle or otherwise preserve everything I can.
10. I will grow a little more than I need and donate the extra to hungry people.
If we keep only Number 10, we'll count the list worth making.
Have a happy new gardening year!
 |
| Chinese praying mantis |
The praying mantis is a great gardening companion! Lurking among foliage, mantids lie in wait for insect prey. With luck (depending upon your point of view) grasshoppers or other garden pests will be on the menu. Learn to recognize the insects, beneficial and otherwise, that inhabit your garden.
Subscribe to:
Posts (Atom)